You need a cable with the correct plug on the end of it to connect an instrument or mic to your sound card. Low-priced sound cards usually have 1/8 inch analog jacks (inputs) marked Mic and Line, and might have a digital input marked S/PDIF. The Line input is the correct one for most electronic instruments such as electric guitars. The Mic input is calibrated to accept the input from microphones (however, you can usually get a better recorded sound by plugging a mic into a preamp or mixer with preamp, and plugging the preamp or mixer into the Line input). The S/PDIF input is the one to use for digital audio sources such as samplers and some CD players. Guitar cables usually have a 1/4 inch plug on the end, so to connect an electric guitar to a 1/8 inch jack, you need a 1/4 inch-to-1/8 inch adapter, which is readily available at electronics supply stores. If you’re not sure what kind of inputs your sound card has, you can actually measure their width (diameter).
If you have a more professional-grade sound card, the input jacks will probably be 1/4 inch, and you might also have some XLR inputs for low-impedance microphones, and S/PDIF and possibly AES/EBU connections for digital input and output. If your microphone cable has an XLR plug on the end of it (an XLR plug has 3 pins sticking out of it), and your sound card only has 1/4 inch input jacks, you need to put an XLR-to-1/4 inch adapter on the end of your microphone cable.
The 1/8 inch plug should be plugged into the sound card’s Line input, although plugging into the Mic input will also work. If you use the Line input, make sure you have selected
Line-In on the
Windows Record Control dialog box (Windows Mixer). If you use the Mic input, select
Microphone. To open the Windows Mixer—double-click the
Speaker icon that’s on your Windows taskbar

to open the
Play Control dialog box. In the
Play Control dialog box, use the
Options > Properties command, select
Recording (under
Adjust volume for), make sure
Line-In and
Microphone are checked, and click
OK. In the
Record Control dialog box, click the
Select check box in either the
Line-In or
Microphone column, make sure the sliders are in the upper half of their range, and click
OK. If you don’t see the Speaker icon on your taskbar, you can open the Windows Mixer by using the
Control Panel > Hardware and Sound > Volume Control (Windows 7) command.
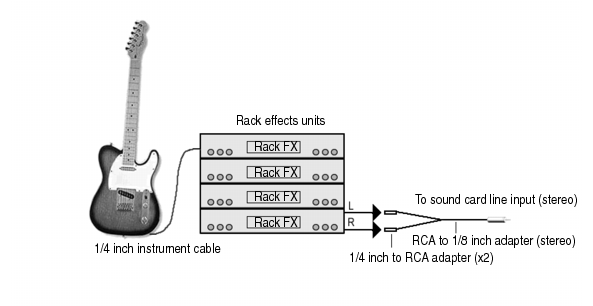
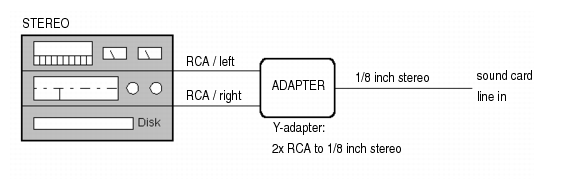
This diagram assumes that the output of the rack is at line level (consult your rack’s documentation). If it is at pro level instead (+4 dB), and your sound card does not accept a +4 db input, you will need to attenuate (lower) the F/X rack’s signal. To do this, use a mixer between the rack’s output and the Y-adapter. If the rack has only a mono output, a 1/4 inch mono to 1/8 inch stereo adapter should be used instead of a Y-adapter.
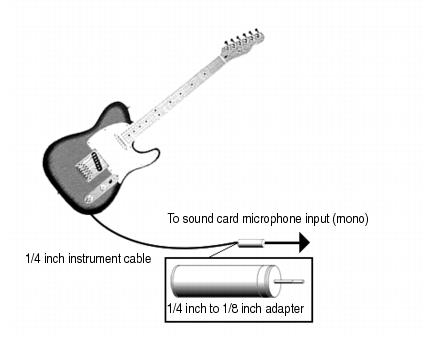
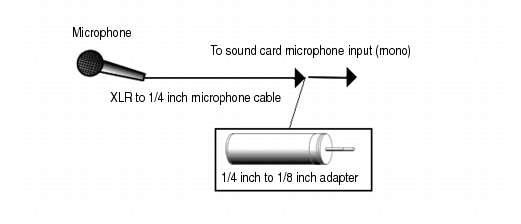
Microphones can be plugged into the sound card’s Mic input. Some inexpensive microphones are made especially for use with sound cards and come equipped with 1/8 inch plugs. However, better quality microphones take better quality cables, which do not terminate in 1/8 inch plugs. The following figure illustrates how to connect a microphone that terminates in a 1/4 inch plug to a 1/8 inch input:
The output of a stereo component can be connected to the sound card’s Line input, using a dual RCA to 1/8 inch stereo mini Y-adapter. Many portable cassette players come with this kind of adapter, or even with a single cable with all the necessary plugs. In the following diagram, a stereo component is connected to the Y-adapter using standard RCA cables:
If you are using your computer’s internal CD player, and it does not have its audio output cable connected internally to the sound card, run a cable from the CD player’s Headphone jack to the card’s Line input. If there is no Headphone jack, you’ll need to use an external CD player.